Friday, December 7, 2007

New Tools

Hello again to all who read my little blog.


Winter is officially here again and I am layed off as of Monday the 10th of 2007. I've been in the shop this afternoon. I have spent a lot of time looking at the boat and wondering where to start. While I've been wondering, I decided to fire up the shop vac and clean out the summers debris... spider webs, spiders, moths, flies, dirt, dust and anything in general that could have accumulated in and on the boat while I've not been around.
Tools !

My wife has purchased me some new tools... actually for Christmas but,... I get them now.

She, at my request :), bought me a beautiful counter-sink set with tapered drill bits, stop collars and plug cutters made by Fuller. I have been wanting a set like this ever since I read about them on Dave's site. I can finally retire the junk that I have been using to drill my counter-sinks... at least to somewhere deep in the tool box where they won't be in my way.

Quality tools, to me, means that I can produce better results with more accuracy as well as doing my job easier. This particular set is designed to drill the holes with a taper identical to that of the screw that is going into the hole. This is very important when using hardwood. I have found this out the hard way. Last winter, without the luxury of this set of special counter-sinks, every hole that I drilled had to be drilled with two separate bits and counter-sinks to allow the silicone bronze screws to properly imbed themselves into the wood without breaking. Life is going to be so much easier now..... I love my tools. :-)
My wife is sooooo nice :)
Anyway, I did not install the cabin's beams or the batten after making them. I just left them laying on the boat all summer. As a result, the batten has lost some of it's arch. So, I have fired up the steam box and am cooking another piece mahogany right now to re-make that batten.
The beams were ok. Nice and straight like they should be.
Till next time....

Thursday, December 6, 2007

Rusting tools.

Just a quick note here.
I worked in the shop just a bit last night. Some of my tools have been rusting. The tables on the band saw, as well as both drill press had much surface rust, apparently due to the cold weather, so I spent some time cleaning those up last night. I used a scotch bright pad on a die grinder for the majority of the rust and finished up by hand and coated everything with a very thin layer of machine oil.

Ever since I fired up the heater the rusting seems to have stopped. There are a few more tools yet to be cleaned.

I also spent some time looking at and thinking about the boat. I'll be laid off after the weekend and will have much time on my hands.

Sunday, November 18, 2007

Summer of 2007

Hi to everyone who visits my little workshop.

It's been a long summer and I have much to tell. Unfortunately, there hasn't been any work on the boat. Summer brings warm weather and that means lots of work at the concrete plant where I work. If I have failed to mention earlier in this blog, I drive a concrete mixer for a living, as well as many other things around the plant like dump trucks, tractor / trailors, bucket loaders, the forklift, the skid steer and anything else that I can do. Warm weather means contractors want to pour concrete... and we've poured a boat load of it this summer, (ship load actually).

If you've visited this site before, you'll notice that the first slideshow to the left has a completely new set of pictures... and I've added a music video from one of my favorite artists... Kitaro. Hope you enjoy the music.
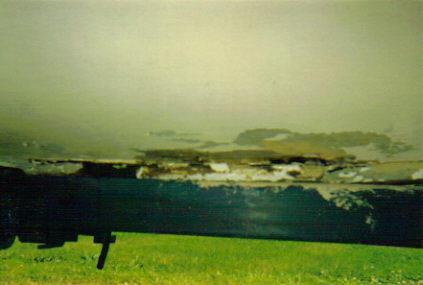
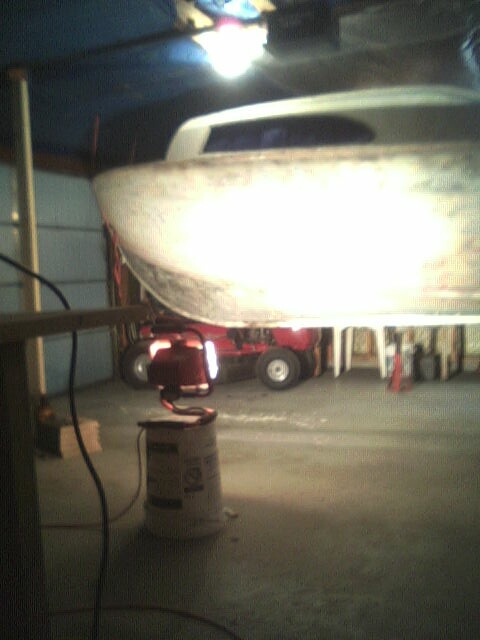
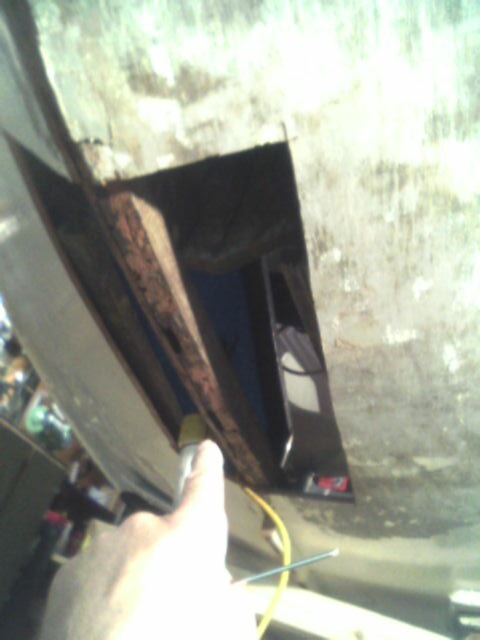
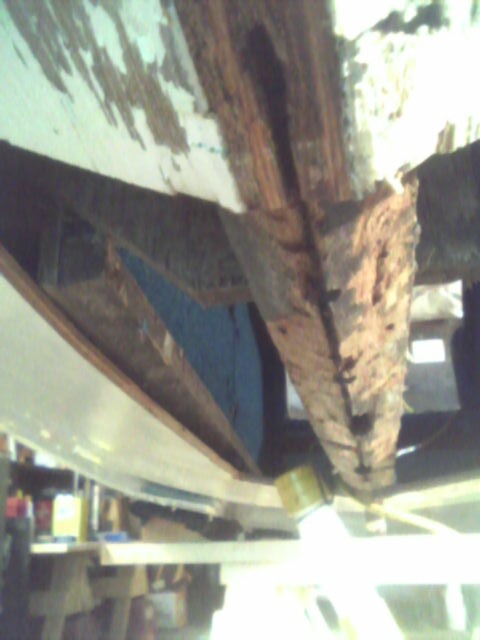
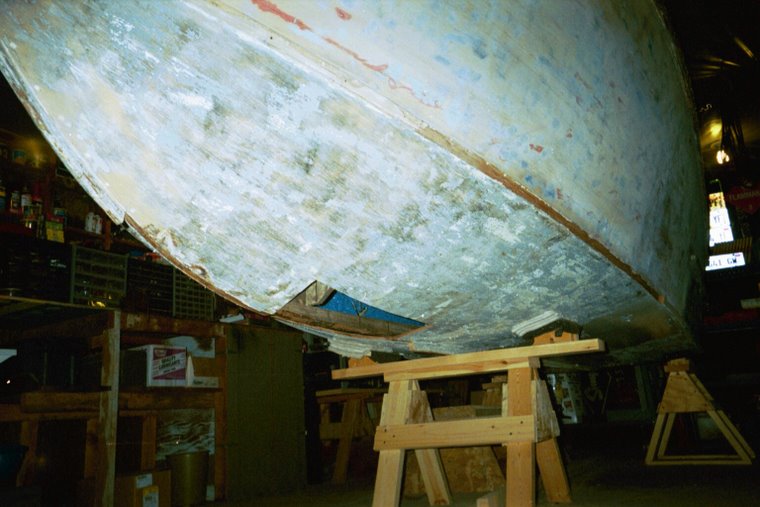
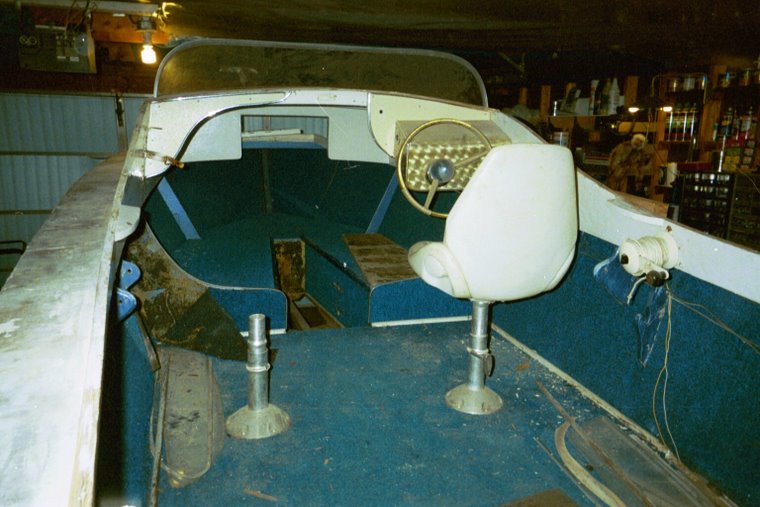
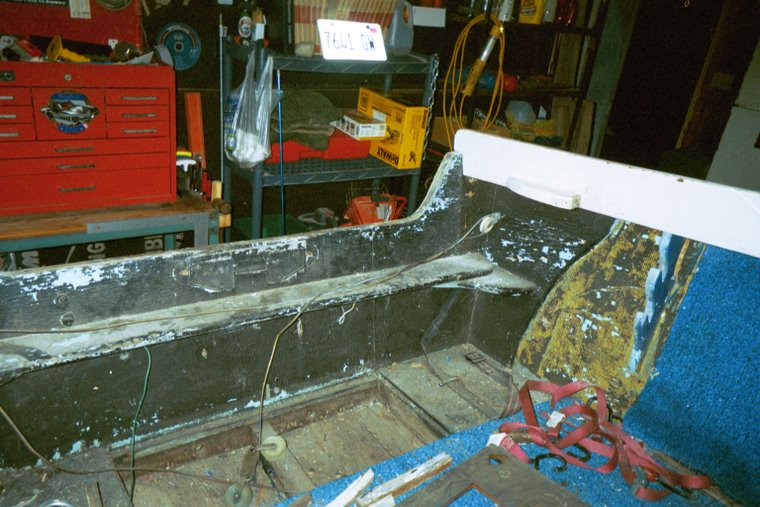
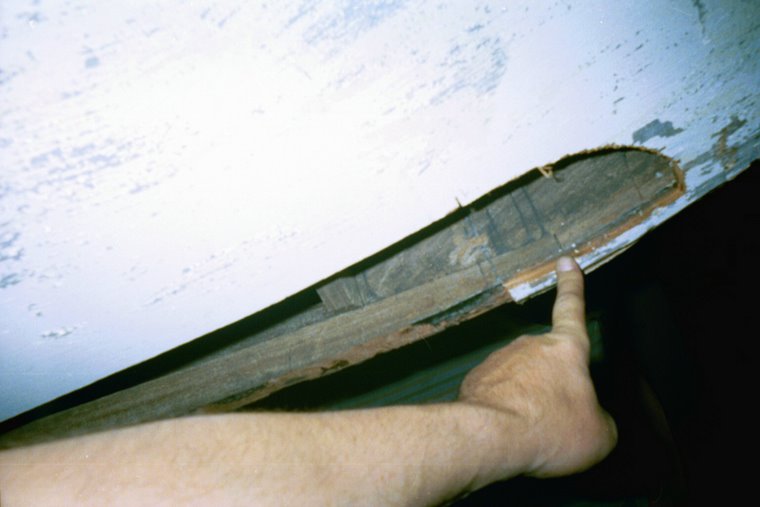
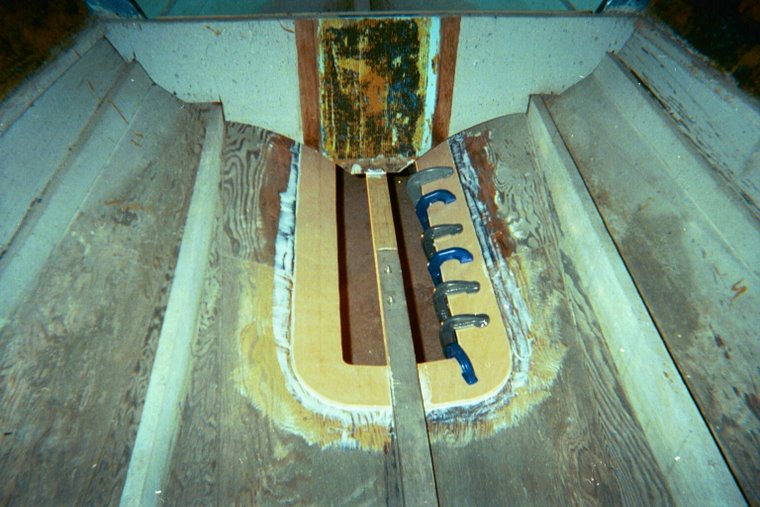
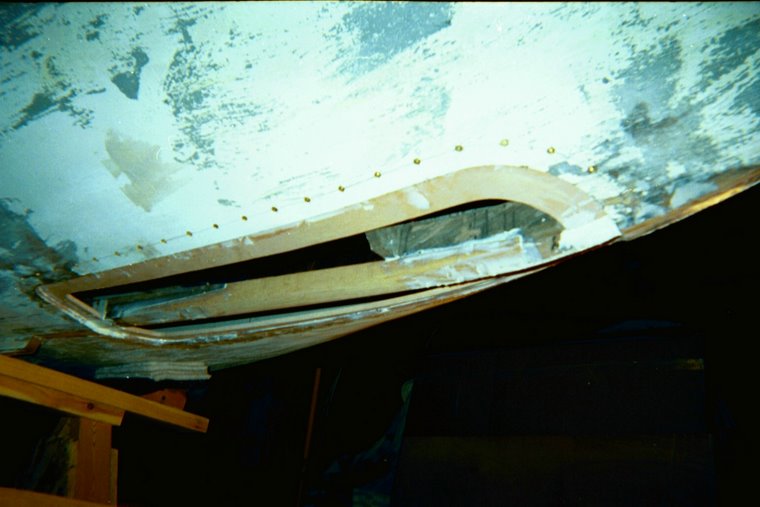
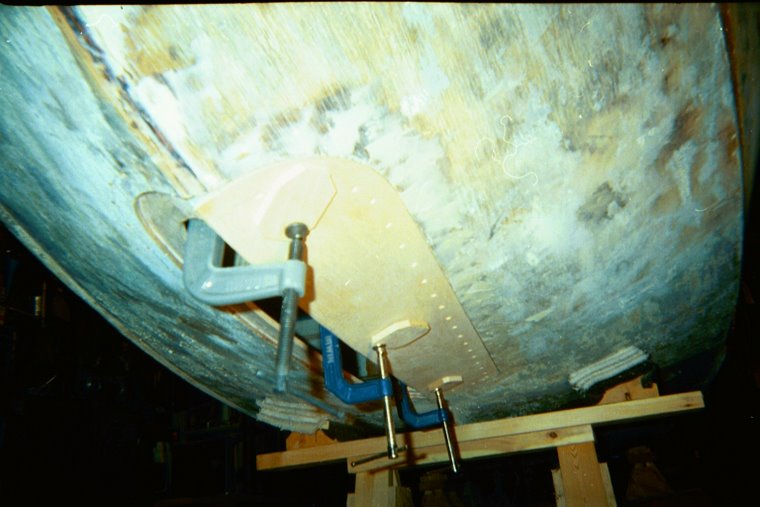
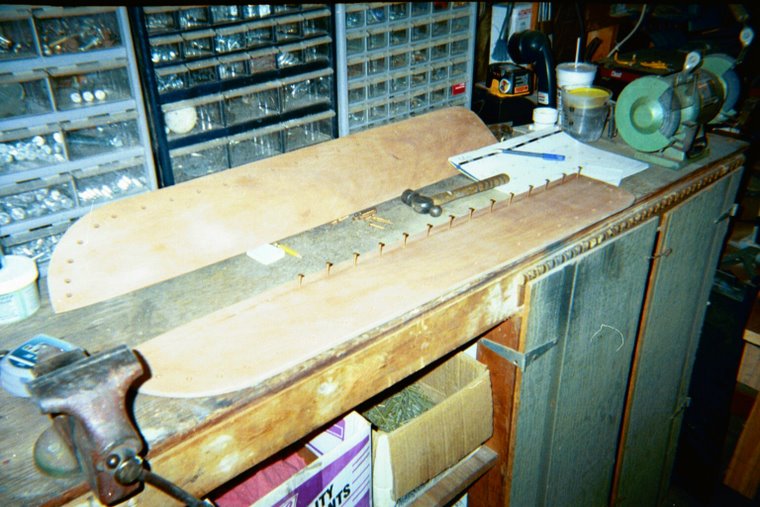
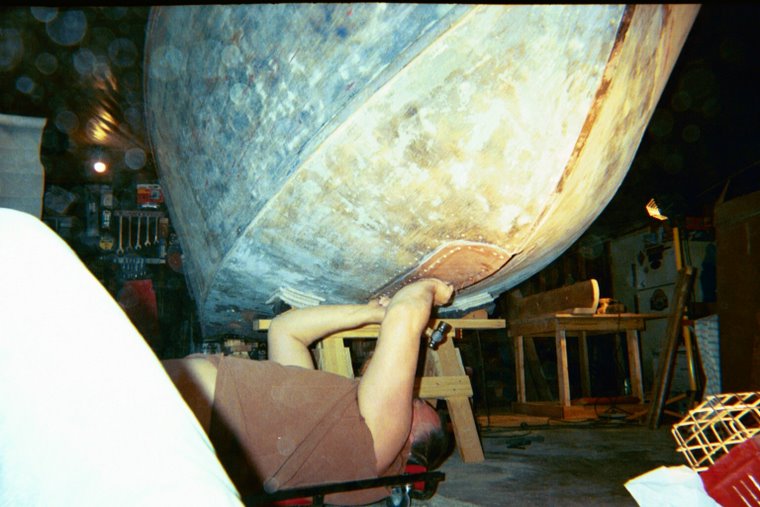
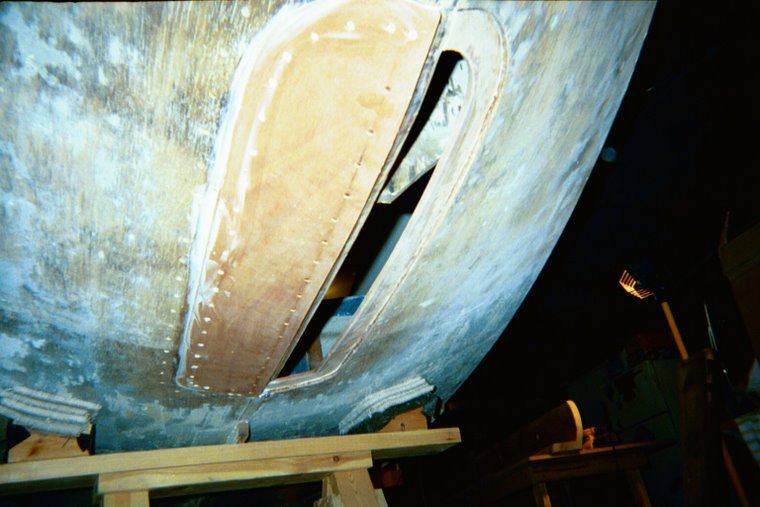
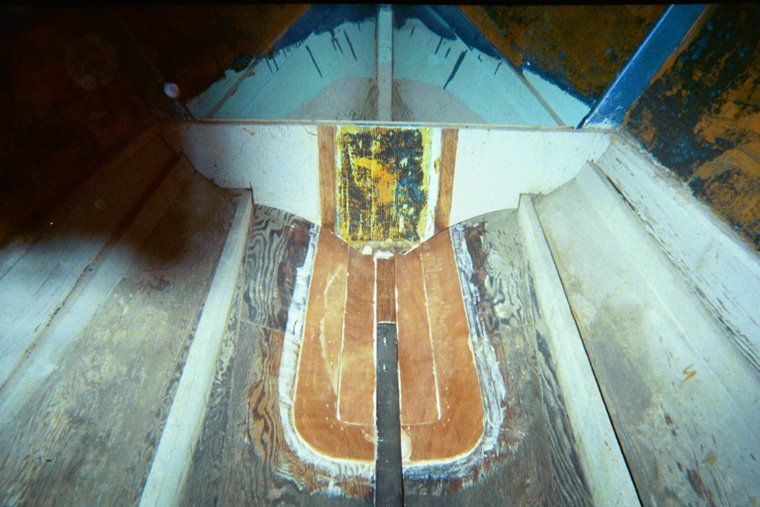
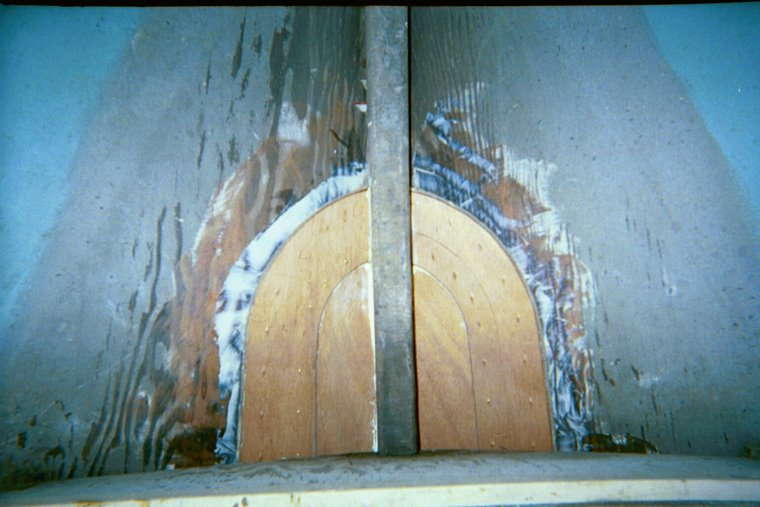
The pictures show some of the work that I did on my boat last winter... 2006-2007.

I'm looking forward to working on her again this winter while I'm laid off work.

Aside from working at the concrete plant, I've accomplished much in what little spare time I could salvage out of my days and weekends.
(I typically work 8 - 12 hours per day... 6 days a week).
(During the fall harvest I was working as many as 16 hour days and 7 days per week for about 8 weeks straight.)
Just a note... this is about the same time as last year when "Abbeygirle" came to live here with us.

THE WORK
As mentioned in the "Tuesday, May 1st" posting, I had started several flower beds for my wifes flowers, bulbs and bushes in the back yard. I also landscaped the front yard with much of the same. A real patio was in order as well so, I built a 13' x 17' patio out of Dutch coblestones. Two different size stones in three colors. This I did while working 12 hour days and staying outside as late as 10:30 PM... for a week with temperatures in the high 90s ! UFFDA !!!


If interested, pictures of everything are available to view at the following link.

Here's just a few pic's:


I also, (during the harvest), organized a benifet ride for my boss who has been diagnosed with colon cancer. In September, a friend of a friend twisted my arm a little bit and convinced me to buy his motorcycle... a 1995 Honda Shadow ACE VT1100 c2.

Shortly after buying the bike I found out about my boss' condition and decided to host a benifit ride in his honor. I had to take off work on a couple of sundays to research the route and the stops but, on October 21st, 2007 we rode! We had 11 bikes, one van (our mechanic... just in case !), one bright red corvette (my boss' father inlaw) and my wife in her car. A total of about 20 or so people actually riding and many other people (including Ron & his family) showed up to see us off. It was great !!!

"Ride for Ron" was a huge success. I originally intended to buy only 15 or 20 shirts and hoped to raise enough money to cover the cost of those shirts. I ended up ordering 45 shirts (with an additional 10 to back order), sold all of these with the exception of 4 or 5 of the smaller sizes. The donations were enough to pay for all of the shirts as well as an additional $1200.00 or so to give to my boss Ron to help him with his medical / nutritional expenses due to the cancer treatments.

We rode approxamately 170 total miles from central Illinois (USA) into Indiana, around two state parks (Beautiful fall scenery), and back home. When we got home we all stopped at Ron's house for a "Meet & Greet" with Ron and his family.

Again, pictures of the ride can be viewed here:
Here's a few pic's of the "Ride for Ron"

Here's me...


Ron, his wife Lori & two daughters.


Now, at last, I come to the news that I've been waiting to tell for some time now !

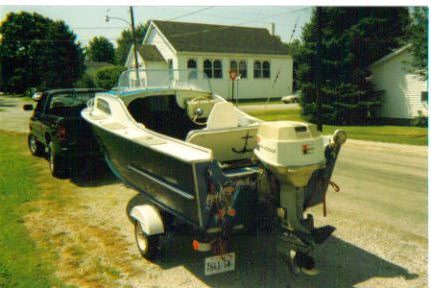
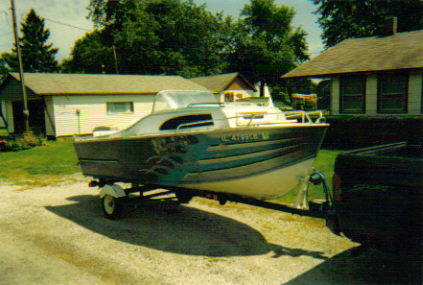
As I have mentioned on the front page of this website under "About my Boat" my boat was built by
KAUFFMAN BOATWORKS, OSPREY, FLORIDA.

On Sunday July 29 of 2007 (this summer) I was contacted, via e-mail, by a man who's name happens to be... George M. Kauffman, who is one of six children of George H. Kauffman, the founder of Kauffman Boatworks and the builder of my boat...

Wow.

I never expected my little website (blog) to reach quite so far... this is awesome to say the least.
I have since been contacted by two more brothers in the family, John and Karl Kauffman.
Kauffman Boatworks is no longer in business. I don't know when he started building boats but, from what the Kauffmans have shared with me, Mr. George H. Kauffman was born around 1920, took part in WW2, started building wooden boats in Osprey, Fl. untill he switched to building fiberglass boats and moved his shop to Venice, Fl. and eventually stopped making boats all together in 1970 to take a job as a foreman at a yacht yard in Massachusetts on the Island of Marthas Vineyard. He later passed away in 1987 in Boston.
That's about all that I've learned about Mr. Kauffman, as the builder of my boat other than the fact that he did have hired workmen to help build the boats.
George (the son) seems to be quite familiar with the building process as he has explained in much detail how these old boats were made.
Thank you very much to each and every Kauffman kid who has contacted me regarding my old boat. You have all "made my day" !!!
I wish that I could post the 4 pictures that George has given me but for some reason they won't load onto blogspot... I'll keep trying though.
Untill next time....
Happy trails.

Saturday, June 23, 2007


Well, it's Saturday night now (June 23, 07) and I thought that I might update this blog.
A couple of nights ago I actually decided to work a bit on the boat. It's been quite some time since I have as I've been very busy with work and our yard.

I've had the cabin & cockpit soles (the floor surfaces) partially removed for quite sometime now to install another floor (a brace under the actual floor surface).
I had replaced the entire floor and it's bracing over the winter but, failed to seal up the screw holes underneith... some 85 or so holes... a futile effort on my part - - - to be lazy.

Anyway, I finished removing the 4 sections of plywood that make up the soles. I mixed up some filler epoxy and commensed to filling said holes. While these sections of plywood were removed, I thought that I might as well go ahead and mix up some CPES and saturate the screw holes in the plywood where it is fastened to the floors.

The plywood is now completely reinstalled and I am confident that if anything fails it will be my craftsmanship and not water damage such as rot.
Something to remember... This is not a "NEW" build. I'm only repairing and old boat and although I wish to do my best... and hope that it looks good too (whenever possible), I am using scrap wood whenever possible as well as reusing old wood taken from the boat to reduce my cost. The plywood for the soles (in the picture above) is new lumber as well as the floors (braces) but many of the pieces not so noticible are made of either scraps or wood removed from the boat. Some of it is not attractive but, "oh well". "They're in the bildge... right".
I am under no illusions about what this boat is worth or what it will be worth when it is completed. So, I am making every effort to keep cost to a minimum. I do still intend for this boat to survive another 20 or 30 years if not more.

Monday, May 28, 2007

The Abbeygirle (Her Namesake)

The Abbeygirle

The boat is named after our cat Abbey.

This cat appeared out of knowwhere apparently. During the fall of 2006 I was working long hours haulling grain for a local elevator. I would often take my wife with me. One evening, we arrived home around 9 or 10 o'clock. After unloading the pickup truck (lunch bucket, water jug... whatever) we heard this meowing. We searched everywhere. Realizing that the sound was coming from under my pickup truck I layed down and slid under it. This kitten was wedged up under my truck between the cab and the bed and it's frame rail. I have no idea how long she had been there.

So, being just a kitten (and scared of everything and every sound) I allowed her to stay in my garage. Well .... she wound up living in that garage all winter. My wife had thrown out an old comforter that she no longer wanted and set it on my boat... intending for me to put it away with her other garage sale items. Abbey decided that this would make a nice bed... on my boat.

I worked in the garage most of the winter and so did Abbey. She had to get into everything that I was doing. She was my little helper. :)

At some point I started letting her out, eventually allowing her into the house. She was an instant hit with the inside cats (two - both males). She showed an absolute fear of the street in front of the house and thus... kept to the backyard... and usually stayed within whistling distance. Yes, she comes to a whistle... just like a dog ! Abbey would often spend the night outside, even in the snow, and in the mornings I would just crack open the back door and whistle.... and her she comes.

She addopted a "CAT" house that I had built many years ago for our daughters cat (an outdoor cat). This "CAT" house is a two story, insulated structure with a cedar shake roof. So, we didn't worry about her staying warm outside in the cold weather.
This little house, with a cat inside it, will hold enough heat to prevent a bowl of water from freezing even at temperatures down to -20 degrees F.

Eventually though, we all grow up and begin to loose our childhood fears... and Abbey is no exception. One evening this spring she shot out into the street in front of our house and tangled with a car. She suffered a fractured pelvis bone and a severe concussion as well as a scrape to her belly. That was weeks ago. Now she is back to normal. Ripping through the house... terrorizing everything and everybody in her way. Whooop Whooop, go kitty go !!!

Anyway, it turns out, Abbey is not afraid of water like most cats. We often find her taking a shower with us. She absoutely wants to be involved with everything that we do, water or not.

I figure that when this boat is finished she will be comfortable going along on weekend trips to the lake. Due to her accident... and the wife putting her foot down about her being outside, she is now being harness trained. Yup ! Harness trained... and doing quite well too :)


Abbey is learning to walk on a leash... just like a dog. When the boat is ready to go... so will Abbey... fitted with a harness and leash... maybe even a miniature "kitty" flotation device too.

Tuesday, May 1, 2007

Nice weather is here... so is yard work :)

Spring is here and I'm back to work full time. I've also started with the yard work. The boat is on hold right now... for awhile anyway.

My wife and I just bought this house less than a year ago and we would very much like to spruce things up a bit. A little landscaping is in order.

Well,,,,,,,,,,, maybe just a scosch more than a little. The yard hasn't had much care for a good many years and much of the previous efforts to landscape the lot have long since been forgotten so, a lot of work is in store. I've been working for several weeks on two particular gardens for my wifes flowers & bulbs located in the back yard. The soil is hard as a rock... and full of it too.... rocks that is.... full of 2" river rock (previous landscaping ideas long since ignored and forgotten about). I've had to remove hundreds of pounds of this stuff from a 15' x 4' section of ground. I did this by actually hand screening every ounce of soil down 12" deep. I then added about 2" of mushroom compost and spaded this in. Then I added another 1"-2" of peat moss on top of this and spaded this in as well. The result is a very nice rich potting mixture that will hold moisture and provide a wonderfull place for the wife to plant whatever she wants to. Last but, not least, a couple inches of organic mulch to cover everything... and we have a garden.

I've dug up and hauled off two truck loads of sod...
I've hauled in a truckload of organic mulch... two truck load of organic compost... several contractor sized bales of peat moss... 3 tons of mason sand (for the new patio to put the new patio furniture on).

So much work to do... I do admit though... I love gardening !
My wife also bought two large tomato plants ! Planted them in a large pot (24" dia.) that I set up for her. She also picked up a couple of bell pepper plants and put those in a couple smaller pots.

We have a very small lot with two out buildings so, sunlight is a factor that has to be considered with everything. This is why the vege plants are in pots... the most direct light is right on the patio... and we think that it will be cool to walk out the back door and pick a fresh tomato... next to the back door !

Abbeygirle, our outside cat (who the boat is named after), bit off a bit more than she could chew last night. Late in the evening, while we were relaxing in the back yard on our new patio furniture, she decided to run out into the street... she hit a car... or the car hit her ? Anyway, she has a fractured pelvis, and a good concusion. She is very lucky... and so are we. The wife has set her foot down and stated that Abbey can no longer go outside without a leash.

She was originally a stray and basically lived in my garage (the workshop). She has, in the past, always been afraid of the street and the cars so, I always figured that she could stay outside although, I knew that the street out front posed a real threat. She has become a part of the family though and we intend to make sure that this won't happen again.

More about Abbeygirle to come later.

Wednesday, March 21, 2007

Shop Notes:

I've been down for awhile. Seems like I must have worn out the 80 gig hard drive in this computer. Had to send the computer to the doctor and have the hard drive replaced.

Anyway... while it was out... I had to bend another board. Rather than remove my gutter's downspout again, I opted to go ahead and build a simple steam box. Wow, it works great to.

Nothing fancy here.

The hinged door is sealed with standard weather stripping and the box itself has dowel rod inserted throughout the sides to support the wood and allow the steam to surround the workpiece. 45 minutes to warm up the box and 45 - 60 minutes of steam and we have bendable wood.


I used the same heater and boiler set up as before. A really nifty little gadget. All was made out of scrap laying around the shop and even the hinge and weather stripping was salvaged from another project in the past.

As far as what I've been working on .............. I've been trying to finish up the fuel cells inclosure as well as the bracing for the floor above the fuel cell. I've also been filling holes... lots and lots of holes. Other than this, there's not much to report

Sunday, March 4, 2007

Shop Notes:

I mentioned in a previous post how most people have a set of plans (drawings & instructions) to work from. Some do not have such plans to work from. I have found on a few occasions though, that a drawing was necessary. Drawings take an idea from one's mind and put it down on paper enabling a person to see how something is going to look. It can also enable one to see the different dimensions (side, top & front as well as 3-d). A drawing gives a worker the ability to apply measurements (dimensions) to his idea, there by making it possible to "test" it's workability. If your attention span is a bit short (for what ever reason) the drawing helps to keep your idea in focus too :).

A lot of what I'm doing is more or less duplicating something that was already there. Maybe it was broken or deteriorated... but, it was there. Some of what I'm doing to my project is completely from scratch... like the keel repair, the bulkhead between cockpit and cabin and the fuel cell's enclosure. I've had to improvise these ideas in my head and work out how they will be made. Drawing has helped a lot with this.

I used to draw a lot as a kid. In school, I had 4 years of drafting. It's been many years and I've forgotten much but, I can still draw basic pictures and apply the dimensions. I wish that I had a lot more math (geometry) background. The ability to work with angles and other geometric functions is very useful.

The making of the bridge (mentioned in the previous post) was possible thanks to my ability to draw... I had first constructed the box enclosure which hangs between the two bulkheads. Before installing the bottom (3/8" ply), I layed a piece of wood (straight edge) across the bottom ledges of the box and took 3 measurements from the bottom of this straight edge down to the keel. These 3 measurements were taken from precise points along the length of the box. This is how I determined the correct height of the bridge and it's angle or pitch. I actually transfered these measurements to my benchtop and drew it out full scale onto a piece of poster paper that I had stapled to the benchtop. It worked out pretty good too.

I plan to buy all new drafting tools again and set up a drawing table in the shop (somewhere) for future drawing projects. I have plans to add and addition to my house someday and, I'm planning to do the job myself. Also, I have some landscaping ideas to incorporate into the big picture of the house as well as enlarging my shop another 14' to the north. Being able to draw all of this out on paper will help to bring it all together and in perspective.

Here's a couple of pic's of some seating ideas that I have. These pictures are of two seperate boats and were downloaded from the picture galery at www.Boatdesign.net. Their really nice looking seats.
My boat's seating wasn't original but, I do know the basic idea how the cockpit seats were made...( plywood-fold down)... I did't like it either. The back seat was constructed with a heavy steel frame and was basically a bus seat... very heavy too, probably 150 pounds. I hope to design something similar to these pictures for the back seat, which I want to wrap around the port side, maybe both sides. I'll have to draw it all out and see what happens............... Untill next time... ; )

Saturday, March 3, 2007

Shop Notes:

I've been working on the fuel cell's enclosure again. Ever since I made the decision to locate the fuel cell in the cabin under the bed I've been concerned about a few issues like.... how will I design the enclosure..? how will it balance and support the weight (approx. 160 + pounds full of fuel) as well as the weight of two people in the cabin (on top of the fuel cell) and so on..?

I designed the box some time back using 3/8" plywood but, still have been concerned about the weight factors. I've needed to create something to support this weight without causing any undue stress. I've been considering how the cabin floor is supported but, can not see enough room in the bilge to utilize braces in the same manner. I do need to spread this weight out as much a possible though.


I came up with what I refer to as a bridge.

The idea is to spread out as much of the weight as possible across the keel itself (the strongest element in the bilge at this point in the boat).

It's designed to attach directly under the fuel cell's box and sit directly on the keel.

The fuel cell is 47" long and 18" wide. It is supported and enclosed by it's box which "hangs" from and between the first and second bulkhead in the cabin.


The bridge is approx. 27" long and 6" wide on top. The center of the bridge itself is constructed of one piece of 3/4" mahogany in the center, sandwiched by two pieces of 3/4" plywood. The top and bottom are 3/8" ply... the bottom piece being just wide enough to cover the width of the keel while the top piece being a bit wider will support the the weight being transferred through the bottom of the box. The plywood on the bottom of the bridge (being softer than the keel) will eventually compress if it is stressed... sort of "adjusting" or "seating" itself, at least this is how I imagine it to work.
In this picture you can see the bridge sitting in it's position on the keel. The piece of 1" x 2" was used to check clearance across the entire length of the box... It fit really... really good !
This should work very well.

Thursday, March 1, 2007

Shop Notes:

New hatchway dryfitting.

Today, and the last few days, I've been able to work a bit on the boat. Not as much as I'd like though. Sometimes, it's just better to walk away for a time, which is probably what I should have done the other day when Mr. Murphy slipped in to visit. Things have been slow going all week.
New Bulkhead Dryfitting.

I have worked (on and off) on the hatch cover as well as the new bulkhead and today I've focused on the fuel cell incloser too. You'll see in the pictures that I've made a little headway... kicking and screaming all the while..... ;(

Fuel cell incloser roughed in.


Fuel cell getting a test fit.

I have constructed most of the lid for the hatch and it's looking fairly nice so far.
Sooner or later everything will come together and actually be assembled permantly... still have a ways to go though. I have to fabricate a dash as well as the seating (at least the supports for the seats), coat everything with CPES and then at some point soon after I'll be purchasing some sandable primer to apply to the entire inside of the boat... Hulls, Cabin sides, Beams, Bulkhead... the works. I'll have to have a good start on the dash and the seats before this can happen though. Untill next time..... :)

Tuesday, February 27, 2007

Shop Notes:

Shop safety.
No... I didn't hurt myself yesterday, and murphy didn't get me either.

Shop safety is always important. I'm sure that everyone's heard your supposed to wear safety glasses... blah blah blah... Well, I believe in shop safety. I can't swear that I ALWAYS put on my safety glasses when I fire up a saw but, I can say that I should! Safety glasses are really a must... one doesn't realize how important or sensitive his or her eyes are untill one or both of your eyes are damaged. Working in a machine shop many years ago, using diamond studded grinding wheels, I wound up with a piece of a diamond inbedded in my eye. This wasn't life threatening but, it did require a trip to the eye doctor to have it removed from my cornea. Sawdust, metal shavings, wood chips and splinters all pose a real threat to our eyes.
Loose clothing is a definite no no ! Jewelery (big rings, necklaces) is not smart either.

When using saws (bandwaw, table saw, jointers etc.) a push stick is always smart. When I first bought my band saw I wanted to play around with it, experiment cutting little things. One of the first things I made was a simple push stick to keep my hands and fingers away from the blade.
I can honestly say that many times in my life I've had to make due without the use of one or more of my fingers or a hand... even an arm ! (I still have both arms and hands as well as all 8 fingers and both thumbs). I've had 4 broken arms. I've also broke, cut, gashed, smashed and whatever else you can do to terrorize one's hands and didgets many times over in my life time. Trying to tie one's shoes is a real bummer with only one hand.

I keep a medicine cabinet in my shop (with a mirror) stocked with peroxide, bandages, gauze... the bare essentials to patch something up if needed, at least untill I can get to the hospital, if needed. The mirror is handy too. Even wearing saftey glasses, you are still going to get something in your eye once in awhile, especially when your on your back under the truck and looking up ..................................................

Shop Notes:

Yesterday was a disaster... more or less but, a disaster.
I was trying to re-fabricate the individual pieces that make up the hatch cover ( a completely new hatch) and could not make the simplest of anything without messing it up. The hatch face I made three times... this is just a piece of plywood approximately 5" x 24" rectangle shaped, nothing fancy... no bevels... or curves... or radius'... just a rectangle. Three times... :(

Today will be better and, I hope to finish the hatch cover pieces and move on to the bulk head.

Monday, February 26, 2007

Murphy... I know your in here !

Ever have one of those days when you know that Mr. Murphy is lurking somewhere behind you watching everything you do, and he's making sure that you can't do anything right ?
Well, he's in my shop right now. It seems that I cannot perform the simplest of tasks today. I've messed up everything that I touch... Everything !

Sunday, February 25, 2007

Shop Notes:

Yesterday, I installed the remaining floor braces and then the cockpit floor itself. The floor consists of two layers of 3/8" plywood. The plywood was completely treated (both sides as well as all edges) with CPES to prevent water damage, and it will surely see it's share of water. The first layer was layed out and stapled with galvanized 1/4" x 1 1/4" crown staples basically at the corners and centers of each side to keep it flat until the second layer could be layed out and fastened. Each layer consists of two pieces of ply... one fore (running the full width of the floor) and one aft (likewise). Each seam is positioned directly above a brace. The seam on the first layer is positioned forward of the center (athwart ship) of the floor while the seam of the second layer is positioned aft. The second layer is secured every 5" all the way around each piece with SS #8 1 5/8" screws predrilled and counter sunk.

In the very back, the first 15"-18" forward of the transom is a separate piece of plywood (single layer) left unattached for access to the bilge. This piece will eventually have holes cut into it on either side of the keel for bilge pumps. The keel is solid (no holes connecting the bilges) so a separate pump for each side is necessary. This is also where the batteries will be mounted, one on each side, to the outside near the hull.


Now that the floor is in, I can grab my trusty bucket (an upside down seat) and start to heat and dig out the epoxy plugs on the cabin sides to tighten them up. There are 13 screws on each side. I got no less that 1/4 turn out of every screw and as much as an entire full turn out of some and, all but one tightened down. I had to remove one that was stripped and re-drill for a new screw.

Later, I decided to take a look at the hatch. This thing is crooked and it's been bothering me for some time as to whether or not I should mess with it. I can't stand it... The wood around it (coaming ?) is rotted in places and it's just not square...

So, I started by removing all of the trim around the opening. I grab my square and straight edge and start studying this picture. I think this procedure requires a beer. Drink beer while looking at square crooked hole. Think..... think..... measure this.... measure that.... drink... think.... measure... you get the picture, right. Finally, I decide to start with the upper left (looking aft) corner of the hatch opening. I figure that I'll start with this corner and square everything else to it. So, with straight edge in hand, I begin to mark off excess wood that will need to be removed. I grab a rasp and my surform and start to shave off said wood. Remove a little wood here... a little more there... a slight cut from the jig saw in a couple of corners, a little more shaving and whalla ! SQUARE.

I can live with it now. Time to call it a night.

Saturday, February 24, 2007

Hats off to Dave "Rational Root"

I recently mentioned that I've ran across another blog where "Dave" is building his own boat by scratch. See his link on the left (Daves Boat). Dave lives in Ireland. It is cold in Ireland and even in the summers it doesn't get real hot I gather. If you read some of his blog you'll see that he doesn't have a garage or shop. Dave is building his boat outside... in his yard.


This post is sort of my "HATS OFF" salute to Dave.

My wife and I moved into our current home about 9 months ago. We previously lived in a house that "sucked" with a grand garage... 24' x 36". The garage/shop was actually bigger than the house ! Anyway, we wanted a larger / better house and had searched for 6 months or better until we found this one, and bought it. The point that I'm trying to reach with this paragraph is that we could have settled on many other houses (nicer houses) a lot faster... but, I needed my "SHOP" space to work on my boat. My boat was mostly bare wood at that time (on the outside) and I didn't want it exposed to the weather until it was finished.

Dave is building his boat outside... ! It's dark when he gets home from work. He has to drag his tools out to work, run power cords, set up lighting, perform his work in in the midst of half light and half shadows and then has to put everything away each and every night when he is done. This drudgery alone would prevent "ME" from working more often than not. Oh, did I mention that if it rains... or even looks like it might rain... NO WORK. He doesn't have any of the luxuries that are often "TAKEN FOR GRANTED" when working in an enclosed, well lighted, dry... heated shop where he could just come home from work and walk through a doorway and pick up his tape measure and square and go to work on his pride and joy.

And Dave is not alone in this either. I am sure that many a boat builder works under these conditions.

I would like to share some of those luxuries here with Dave and any other readers that happen across my blog.

So to Dave and everyone that works in less than favorable conditions I take my hat off to you as a salute to your perseverance and dedication. More power to you !

One has to have a place to store the many tools that one can collect... and I have been collecting for a few years... Two drill presses (stand up model and a bench top model), radial arm saw, compound miter saw, band saw ( I love this... and I use it all the time), cherry picker, combination disc / belt sander, air compressor ( I waited many years for this ! ), air nailers and staplers and many other air tools like impact wrench, sanders, grinders etc..., cordless drills, circular saws and a host of many other tools.
My walls are covered with tools, clamps, gadgets and supplies that I've found necessary (or at least thought so). There are many shelves to store shop supplies like paints, epoxies, putty, cleaners, solvents, oils and on and on...
Like most small shops, I have built most of the shelving and storage devices used here, like the storage bin behind my bench grinder to organize the various grades of sand paper. My mountain bike is hoisted up and suspended in the rafters on a simple rope & pulley system. The cabinet in the corner (I did not build this) stores my books and magazines as well as my stereo system and shop music (gotta have my music.... I love music. At this very moment I'm listening to Kitaro's... Kokoro from his album "An Enchanted Evening, Live").
There are lots of storage bins / drawers for things like nails, screws, bolts, nuts, washers and so on (various different sizes). Anybody who works on things (a real "Do It Yourselfer") will eventually collect a boat load of this kind of stuff... and I like to stock many fasteners and supplies so that I don't have to dash out to the store every time I need a screw for this or a washer or whatever. I used to own my own truck (tractor trailer rig) so, I found it very useful to keep a well supplied shop. It just costs too much to pay someone else to do your work for you. Let's not forget about that ever so important "concrete floor" that my creeper rolls across so nicely............ :)
Last, but not least... you just got to have a refrigerator to keep your beer cold ! and close ! :)
Enough I say... Enough......................
Again, my hat is off to you Dave. Keep up the good work and persevere.